
Starting a fitness blog is a really great idea! Not only can you create a potential home-based business through your blog, you create great accountability for yourself through a blog. This page will show you how to start a fitness blog and include some tips on making that fitness blog successful. The Fitness niche is a booming one, and one that can lead to some nice paid opportunities through blogging. My blog is not even a fitness focused blog and I have been able to partner with some amazing fitness companies like Albion Fit, Lorna Jane, Quest and Famous Footwear, to name a few.
A medium sized blog can easily generate $100-$200 per sponsored post, $200-$400 per month in affiliate sales, and another $100 in passive advertising. The sky truly is the limit with blogging. There are bloggers out there who are making 6 and 7 figures doing what they love.
I will show you how to create a self-hosted WordPress blog. I don’t recommend doing it any other way, especially a free way.
Free blog services generally mean that you don’t have rights to the content on your blog. Additionally, your blog can be shut down (Google “Blogger blog shut down”) without notice. Some blogs have been shut down because the blogger was working with a company that the platform owners don’t like. You don’t want to put your blog in someone else’s hands just to save five bucks a month.
Step 1: Snag Your URL and Get Hosted
Ok, now that you’ve got your blog topic and are ready to set up your WordPress blog, it’s time to get a domain name. This will be your website’s address, or what goes here: www.YOURSITE.com.
Tips on choosing a domain name:
- Make it as short as you can. The shorter it is, the easier it is for people to remember and type.
- Make sure it conveys your blog’s message. While trying to keep it short, be sure to include something about yourself or your blog’s message in the URL.
- Don’t steal. It’s best not to copy someone else’s idea when it comes to your blog. I also don’t recommend using brand names in your URL.
- Make it brandable. Don’t make your URL so specific that brands don’t want to work with you. www.mikeeatscorndogsonsundays.com is a little too specific to attract brands. However www.mikeeats.com is a great URL.
It’s time to head over to HostGator to get your domain and hosting.
I am a HostGator affiliate and get a commission when you use my links and my code to save an extra 25% off your plan. I could be an affiliate for any company, but I choose HostGator due to their incredibly low costs and awesome 24/7 customer support. Their one-click WordPress install is perfect for people who are starting new blogs.

Click the “Choose a Plan” button.

As you can see, the baby plans start at under $4.00/month! Enter coupon code FITNESSBLOG to save even more!
Choose a plan and you’ll be at this screen:

Here, you’ll enter the domain name aka your blog’s web address. The first couple you might already be taken. Don’t get discouraged! There are still great, unclaimed domain names out there!
Upon entering an available domain, you will see that it is available and it will be automatically added to your cart (as shown above).
You will then be given the option to add the .net and .org versions of your domain. I generally do not do this and only buy the .com domain.
Scroll down a bit to see this screen:

Confirm your hosting package and billing cycle length and then create an account username and password.
Scroll down and enter your billing info. Their site is 100% secure.
Note: if at any point during this process you get stuck, feel free to contact me (info at the bottom of post) or jump on the phone and call HostGator at 1-866-96-GATOR or clickt he “live chat” button in the top right portion of their page and they’ll be happy to help you out.
Scroll down a bit more for some extra options. I only recommend getting the privacy protection here. The others are not necessary. Domain Privacy Protection is a big deal. If you don’t choose this, anyone can look up who owns your site and your registration information will be public. This includes your email address, physical address and phone number. You want domain privacy protection. With it, they get nothing about you, and HostGator’s information instead.

The next section will have you enter a coupon code. Enter FITNESSBLOG to save 25% on your order! In most cases, they will have already applied a 20% code. Just enter FITNESSBLOG and hit validate and you’ll see the extra savings.
Underneath of that, you’ll be able to review your order. It will look something like this:
 Check the box that you agree to their terms, move forward and complete your payment.
Whew!
Step 2
Once payment is complete, you’ll receive an email within a few minutes confirming your purchase and containing important information. I recommend forwarding this email to another email address that you own so it is in two places just in case.
In the email will be a link to your control panel aka cpanel. You’re going to want to click that. You’ll have to login. The login and password will be in the email as well.
Now that you’re passed that screen, you should get to your cPanel. This is the “back end” of your site and where all of the key technical matters will take place.
You’ll most likely be greeted with a popup. Like this:
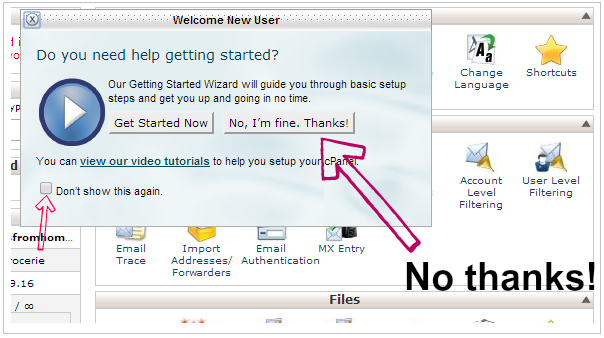 Click “no thanks” and I recommend clicking the “don’t show me this again” box, as the info is easier explained on other parts of the web. Additionally, you won’t want to do much here unless you have advanced knowledge in the cpanel area.
In the cpanel, you’ll see a LOT of icons. Ignore them all for now. You don’t want to spend a lot of time here unless you really know what you are doing. What we will do here is install WordPress. With HostGator, it is actually very easy to install WordPress on a domain. In your cPanel, scroll down and look for a “Software/Services” section. It’ll look like this:

Click QuickInstall to move forward.
Step 3
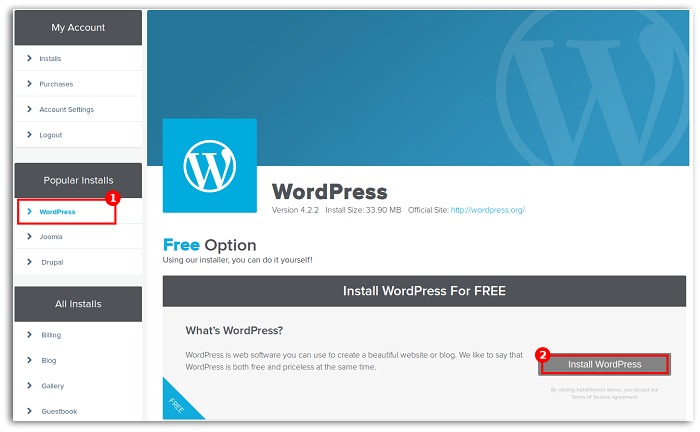
Next, you’ll be at the WordPress install screen.
Choose WordPress on the left under “Popular Installs” and click “Install WordPress” on the right to move forward.

- The Base Domain for your installation.
- The sub directory you would like the site to load from, if desired. You probably want to leave this blank.
Example: Should you wish your WordPress URL to be mydomain.com/site instead of just mydomain.com. Your site will always display this extension if you enter one. - For Admin Email, enter an email address where you want the admin password emailed to. Make sure this is a working email address.
- For Blog Title, enter the name of the website. This is what will appear in the header as the name of your site.
- For Admin Username, enter your preferred user name.
- Your first name.
- Your last name.
- Click Install WordPress when you’re ready to proceed
A progress bar at the top of the page will let you know when installation is complete. Once complete, you will be able to start working on your WordPress site. Check your email for your WordPress username and password as well as a link to your WordPress dashboard.
You may also find your credentials by clicking View Credentials in the bar at the top of the page:

Note: if you are moving an existing domain name to HostGator hosting, this process could take up to 48 hours. Anyone who got their URL and hosting at the same time as shown above should be up and running in one minute or less after clicking “install”.
Step 4
This is what your WordPress dashboard will look like:

Hold your mouse over “Appearance” and click “Themes” to browse the hundreds of free WordPress themes available. When you’re ready to post, hover over the “Posts” option and a new dropdown menu will appear. Click New Post and you’re off and running!
To delete the original post that they put there, click all posts and you’ll see an option to trash that “Hello World” post.
Aaaaaaand that is how to start a blog that is self-hosted on WordPress.
Whew! We made it! Was it easy? Do you have questions? Leave a comment below, email me [email protected] or catch me on Twitter @RealZackReyes. I’m happy to walk you through this process!
Optional Step 5: Choosing a Premium WordPress Theme

While there are free WordPress themes available, I recommend jumping right in with a premium theme. Most often, premium themes are more functional, user friendly and SEO friendly. I recommend a Genesis theme because of the functionality, moderate price and ease of use. All of our sites (including katiedidwhat.com) run on Genesis.
There have been countless times where I’ve made a change here and a tweak there myself as opposed to paying a developer $50 to do it. Genesis makes changes easy for our blogs and that’s important to us.
Depending on how comfortable you are with HTML and CSS code, you will be able to customize your site on your own. If your knowledge is limited, a Genesis theme will look and perform better than any other right out of the box. If you don’t want to touch the design at all, just do a Google search for a “WordPress blog designer” and choose someone who looks legit.
Visit MoreFromYourBlog.com for tips on gaining traffic, increasing your social media following, making money from your blog and much, much more.
———————————————————————————
Step 5: Tips for Blogging Success
1. Always be authentic. Blog about real things, not what you think people want to read.
2. Take great pictures. Readers and brands love blogs who have beautiful images.
3. Blog consistently. This doesn’t have to mean every day, but if you’re blogging once on week and 5 times the next, and one again the week after, people will get confused as to what to expect from you.
4. Use social media channels the way they are intended. Be social on them! Don’t just use them as a place to put your links out there. Interact with people, respond to comments, form relationships.
5. Take is seriously. Blogging really is what you put into it. If you treat it like a hobby – you’ll mostly get enjoyment out of it. If you take a more serious approach and treat it like a business, you’ll have a better chance at seeing some real income.
There is definitely more to blogging that just those 5 things, but I really think that if you only focused on doing those 5 things, you would be successful. It really is that simple. YOu just have to put in the work.
Now, if you haven’t yet, it’s time to start a blog! So scroll back up and walk through the process and get started today!
Great article! I started my own fitness blog (www.katlynharris.com) a few weeks ago and this article definitely helps.
What if you already started creating a free WordPress blog, but now after reading this are enlightened and want to have my domain actually be mine? Would I be one of the peeps who would have to wait 48hrs after installation? Or would I have to start from scratch and transfer over all of my content post by post?
Yes, you would follow the steps on this post and get your “.com” domain and hosting, then follow the steps here: http://support.hostgator.com/articles/specialized-help/technical/wordpress/transfer-wordpress-from-wordpress-com-to-your-self-hosted-wordpress to transfer all of your existing blog’s content to your new self-hosted wordpress blog. Best of luck! Let me know if you have any other questions! :)
xo
I tried WordPress one time before and was so confused excited to try your tips!!
Hi Katie!
I am so glad I got you on Pinterest and you wrote specifically about fitness blogging!
I am a qualified Personal Trainer and my biggest heart desire is to start an online business with my knowledge. I want to make it a home based business because I have two boys…21 months and an almost 4 year old that is half day in a nursery school for some stimulation and the rest of the day they are with me. I do not want to go out and work full time again and just make money and never see my boys and have no input in their lives… It is now almost 4 months I play with this idea in my head and putting it off the whole time. I also approached a graphic designer to help me put up a website but it is extremely expensive!
I am here in South-Africa and I am so scared that it will not work for me… Do you think I can do this from here?
Sorry,it is such lame questions!
Thank you Katie!
Blessings
Monique Thornhill
Hi Monique! Sorry it took a while to get back to you. I definitely think you should go for it! There are people all over the world who are successful fitness bloggers from home. See one example here. Using a blog, he was able to grow his business and is now quite successful working for himself. I hope you find that motivating and go for it! Also, check out my email list for bloggers – it’ll be a help along the way! Click here for that!
This is a great article on starting a blog. I also went with HostGator. So far, I’ve not had a problem and I like the monthly billing. HostGator is the only hosting service that I have found that offers a monthly option. It costs more, but you’re not locked in if you hate the service. I have a “baby” package so I can add other websites as I need to. Right now my only URL is OneDayToTomorrow.com. I’m hoping that one day I will be doing this for a living, so wish me luck!
I am in the process of making my very first fitness blog. This was a great article to read and very informative. Thanks for a great article!
Great information here, thanks for the tips! Can I create a fitness blog and advertise my own personal training business from it? I have not yet ventured into creating a blog but I love to share health and fitness information with others and also want to start my own business. Is a blog the correct platform for business advertisement or must I have a different type of website? Any help would be appreciated! Thanks ????
Absolutely! A blog is the PERFECT platform for advertising your own personal training. You can offer free tips or workouts on your blog and encourage people to contact you for more. A lot of people are doing it this way.
This is such a great post for a beginner blogger – loved the tips at the end!
Hi Katie! If I already bought a domain name (fitmumcinders) with Blogger. What would be my next step?
Hi Cindy! So this article (https://www.hostgator.com/blog/transfer-blogger-wordpress/) explains a bit about how to do that. They also have an awesome chat support that should be able to help as well.